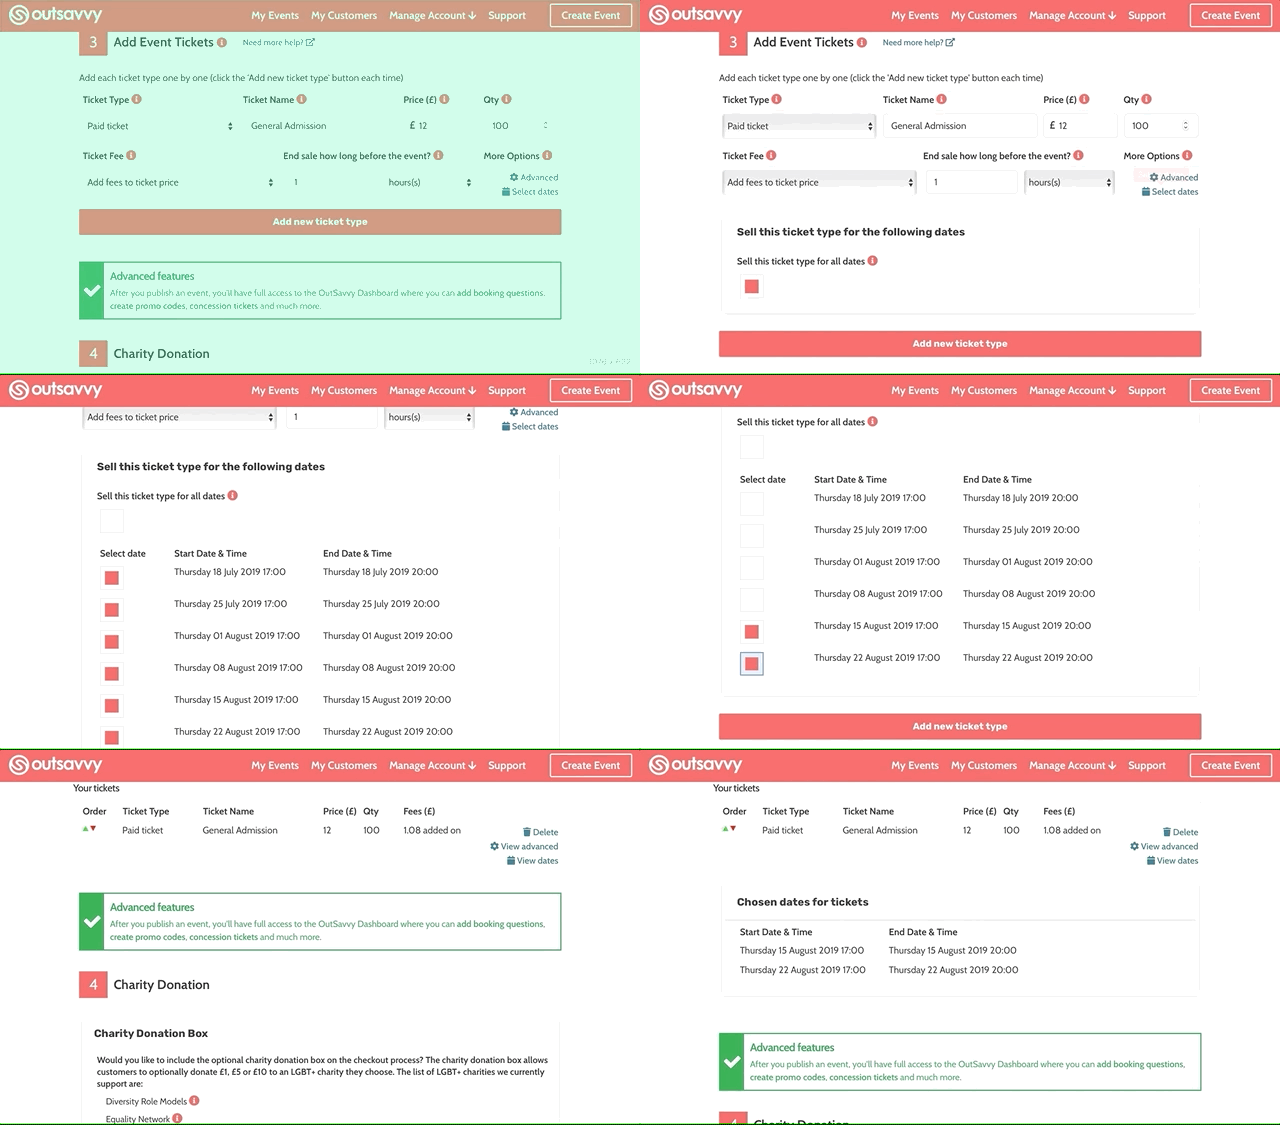
At this point you should have entered your event information as well as your event dates. Now it's time to enter the tickets.
1 Select the ticket type
We have three ticket types on OutSavvy as well as a donation:
- Paid ticket - if you charge an entry fee for your event then select this option.
- Free ticket - if you don't have an entry fee to access your event then select this ticket type
- Pay What You Can - if you would like your customers to pay what they can for a ticket with no set ticket price please select this ticket type. The minimum amount for a Pay What You Can ticket is £1
- Table - if you wish to sell tickets in groups of tables. Specify the number of seats per table, the number of tables and guests will be assigned one ticket per seat. This ticket type also helps you keep track of your capacity.
- Donation - if you would like your customers to give a donation then select this option. Donations are subject to the usual OutSavvy fees. It is made clear on the ticket select screen that this is a donation and not a ticket for the event.
2 Select a ticket name
Give a great description of the ticket type i.e. general admission, first release, early bird etc. This is a brief description of your ticket type. You can provide extra information about this ticket in the Advanced options.
3 Ticket price
If you have entered a paid ticket you will need to enter the price of the ticket. The fees are automatically calculated based on your ticket price. You can add multiple ticket types on OutSavvy such as early birds, general admission etc. Just enter each ticket one by one.
Concessions: You can add concession tickets for every ticket type on OutSavvy. To do this create a general ticket type i.e. general admission. Once you have published your event you can then set-up concessions in the Promocode and Discounts screen. For more information please read the concession ticket guide
here.
4 Enter the quantity
Enter the number of tickets you wish to sell for this ticket type. The number of tickets to sell can be changed at any time once your event is published.
5 Ticket fees
If you have a paid for ticket type or donation you will need to select if you would like to add the OutSavvy ticket fee to the ticket or include it in the ticket price. Ensure you select the correct option, although this can be changed later, if a customer buys a ticket before the change they will be charged the price pre-change. When you add the ticket the fee is shown and indicated if the fee is included or added.
6 On-sale/off sale time
In the dropdown list you can select hours, days or minutes and in the textbox enter the timeframe. If you need time to prepare the event and guests, you may take the tickets off before the event or sell to the very last minute.
Selling during the event: You can also decide to sell your tickets during the event and not take them off-sale before the event. This allows you to sell on the Dash app on the door or simply continue to sell tickets while your event is happening. To do this, edit your tickets once the event is published and change the end of sale time. The end of sale time can't go past the end time of the date of your event.
7 Advanced options
There are a number of advanced options available when setting up a ticket that can be found by clicking the advanced option cog. Here you can set the on sale start date if you do not want the tickets to go on sale immediately, the entry time for these tickets and the max and min number of tickets each customer can buy. For example, you may limit the number of tickets one customer can buy or specify a customer has to buy at least two tickets.
Hidden tickets: You can set tickets to be hidden from customers on OutSavvy and unlocked with a promo code. Select the Hidden option in the Advanced menu and follow the guide to creating a promo code
here.
8 Different tickets for different dates
If you have multiple dates for your event, you can set tickets to be specific to certain dates or apply tickets to all dates. To do this just select the Calender icon. You can select to apply the ticket to all dates or select individual dates.
Once you have entered all the information, click the Add New Ticket Type button. All the entered tickets are shown in a list and individual ticket types can be deleted if you make a mistake.

Once you have entered all details for your ticket click the 'Add new ticket type' button. You can now add extra ticket types or continue creating your event.